
If you have tyrolean render finishes on your exterior walls, then you'll probably already know all about this type of render, right?
If not, don't worry, because today we'll provide you with a brief overview of what a tyrolean render finish is, before looking at a question many people with this type of render finish have: how do you paint over tyrolean render?
Ready to find out more so you can decide if painting over your tyrolean render is right for you? Then join us below!
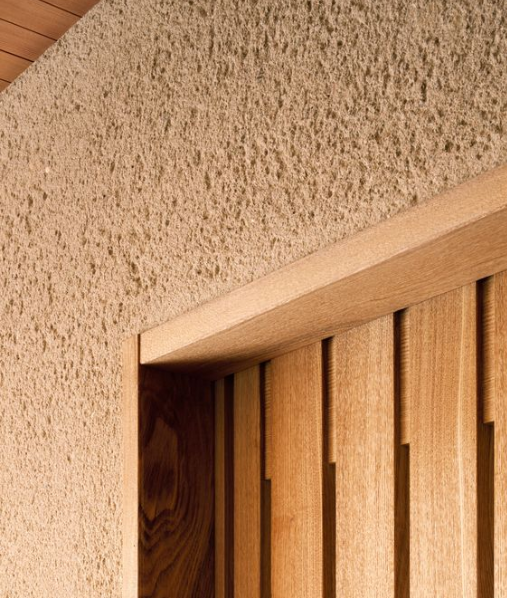
Tyrolean render is a type of render finish for your home that adds an extra layer of protection for your whole house by covering the exterior walls. This makes the house more weather proof, waterproof, and resistant to cracks, damage, and moisture penetration/damp.
Tyrolean render is essentially a cement mixture containing polymer, or tiny plastic materials, that makes the cement bonding mixture even stronger.
Because a tyrolean finish provides texture in the form of a pebbled or weathered appearance, many people confuse it with pebble dash, spar dash, or roughcast render, which are all just another example of an exterior wall coating (although they will often be treated similarly to a tyrolean finish when applying a paint finish).
If you're unsure which type of render you have, check out guides online or contact the professionals.

If you were around for the application process, then perhaps this next section will jog your memory.
A tyrolean finish is applied using something known as a tyrolean gun. This tyrolean gun is filled with the tyrolean finish mix and applied to the wall by flicking the mixture at it using the gun. There are many different versions of this tyrolean gun available, but traditionally you'd just use a hand-powered gun that you rotate using the handle which then flicks the finish on to the wall or previously rendered surface.
Although the application sounds fun, applying a tyrolean finish is incredibly difficult. Professionals have to stand at the same distance as they apply for an even, thin finish, and rotate the handle evenly so the render isn't applied faster or slower in parts.
If simply using a tyrolean render as the final finish coating, then you'll usually stop after the first coat. If using tyrolean render as your main render to protect each exterior wall around your whole house, then you may need a second coat (and sometimes three coats, depending).
Between each coat, you'll need to wait for the render to fully cure and dry before applying the next coat, so this thin coating can be a more durable version.
So that's what it is and how it's applied, but now let's focus on why we're all here today - painting, and more specifically, can you even paint over a tyrolean render?
Many people question this because tyrolean doesn't provide a smooth finish, and the rough texture it does provide doesn't make it look as though it would accept paints readily, and nobody wants loose paint on their exterior walls.
But actually, yes, you can paint your tyrolean finish to add more colour to your property, since the standard finish is typically white or grey.
Before you rush into picking out an exterior paint from anywhere and slapping it over your old tyrolean render, though, you might want to pause and consider your options, because there's more than one way to add colour to your tyrolean...
The three options we'll present to you below aren't for everyone, but they're worth talking about, so you don't think painting is your only option.
This method will cost a lot more money than if you pay professionals to paint your tyrolean, but it may be the best option if you haven't actually had your tyrolean finish applied yet. Why? Because you can actually add colour to your tyrolean mixture during the application process, meaning you can add colour to your walls right away.
Speak with the experts you wish to hire to see if they can source a tyrolean mix that has coloured dye mixed through. That way, the colours you pick will be embedded into the tyrolean render itself, making it a more long-lasting solution.
Of course, if you later change your mind about the colours you've chosen, you can always paint over it, too.
Picking a coloured tyrolean render might be initially more expensive, but it helps cut costs when it comes to painting each exterior wall later because it'll already be done for you.
Again, this is only worth considering if you haven't had your tyrolean render applied yet, or if your old tyrolean render is at the end of its life and the entire surface coating needs replacing.
Although without a doubt, tyrolean is one of the most popular renders when rendering residential and commercial buildings, there are other coloured options available:
And that's just to name a few. Of course, you might prefer the textured finish of tyrolean and that's fine, but it's always worth considering your options if you want a coloured render that will last for years and help save costs on painting and repainting, too.
It's true, though, that this method would be costly again, and likely unnecessary unless your tyrolean render isn't working as it should and needs to be replaced. In these instances, it's always worth considering your options in case a new render would work better for you and your home.
And finally, we get to your third option: painting. By picking out the right masonry paint, talking with professionals about what options are best for your home, and hiring a team to carry out the work for you, you'll be able to achieve a high-quality finish for much less money than the two options above - making this third option the most popular.
So, how would we professionals handle painting over a tyrolean render?
Below we'll talk you through the process and detail each point of the job so you can see how we would paint over your existing finish to leave your tyrolean render with a lovely painted surface that will be the envy of your neighbours.
The very first thing professionals should do when they arrive to paint your rendering is inspect that rendering. If there is any unsound and suspect tyrolean, then it will need to be removed and replaced.
Failure to do this fundamental part of the job could mean you're simply painting over a wall that has damaged render, meaning it is no longer waterproof or doing its job effectively. This will ultimately mean more work, more money spent, and a lot more paint needed down the line when it starts to peel and the cracks beneath become worse.
Any team of experts will discuss any problems with your exterior walls beforehand and provide advice about replacing all or some of the tyrolean as needed to prevent moisture, cracks, or damage to your home.
Once any damaged tyrolean is fixed, they can move on to the next stage.
Cleaning is the next stage, and this will need to happen before any primer or paint is applied to the wall. Why? Because without this crucial step, primer and paint won't be able to adhere to the wall properly, and it's also possible that any serious dirt, grime, or mould beneath the paint will eventually show through, ruining the look of your exterior walls.
Depending on the level of dirt, grime, or mould, we might simply need to spray each wall of your house with a hosepipe on a low pressure setting (too high, and it could possibly destroy the delicate layer of tyrolean finish). This just clears off the dirt and grime to provide a clean surface for the primer and paint later.
However, if your rendering has been affected by mould, then a fungicidal wash may be necessary. By washing the walls of your house with this sort of mixture, mould can be effectively killed and cleaned away, making it far less likely that it will return and show through the layers of paint that will be added later.
Again, professionals will give you advice about how much cleaning is necessary for your home so you understand what they're doing at each stage of the job.
Next up is the primer - one of the most important steps in order for the paint to stick to the rendering. Because tyrolean is textured like pebble dash or roughcast/spar dash, all of these types of rendering will need additional help in getting the paint to adhere to the surface of the wall.
And what's really important is picking the right primer for the job too. Primer you'd usually use inside to paint walls or furniture in your house won't cut it here because it won't offer the same level of protection.
In our experience, the best primer for the job is often a coating of water resistant paint primer applied to walls before applying exterior or masonry paint.
Once the walls are covered in this primer, they'll be ready for the first coat!
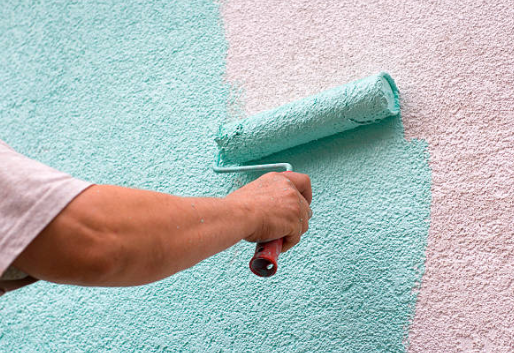
Now, you might be wondering how masonry paint is best applied to each wall of your house, and there are a couple of different options.
First, is to hand paint it using a brush or roller. This isn't necessarily a terrible choice, but it can make the paint more liable to peel, which can ruin the look of the painted surface and expose the wall beneath, making the job look patchy overtime.
The second option, and one most often used, is to spray apply the paint on to each wall surface.
When the wall is spray painted in this way, it allows for an even cover to be applied and ultimately will adhere to the wall much more successfully. The even finish often looks better too, so there are many reasons why covering the wall using a spray coating of masonry paint is the better option.
After the first coating of paint has dried, a second coat is usually necessary, for a few different reasons:
Once properly covered, masonry paint should last between 5 and 10 years depending on the weather it faces (e.g. more sun will fade the paint quicker, but with properties by the coast wind and rain can take its toll on the coats over time, too).
This second coat should also be applied using spray for an even, satisfactory finish that looks great.
After the second coat, professionals will usually review the job to ensure a third coat isn't necessary. Additional coats are usually only required where the renders have been previously painted and the colours beneath the fresh coat aren't covered properly.
During this review stage, touch-ups may also be necessary here and there and you'll be able to give your own advice if you feel something is out of place.
Once any final touch-up work or an additional coat is dry, the work is done and, as mentioned above, you can expect the paint to stay looking in great condition for the next 5-10 years confidently.
Before we leave you, let's answer a crucial question: can you paint over tyrolean walls yourself?
Yes, in theory, you can. However, ensuring you do the job perfectly is essential if you want to avoid the cement-grey shade of the old tyrolean from poking through patchy paint.
Painting tyrolean walls isn't easy either and requires a great deal of skill and knowledge. First, you have to pick out the right products, apply them all evenly, and ensure you have the time to allow coats to dry between each layer before moving on to the next step.
If you have the time, knowledge, skills, and advice from a professional, then yes, you can paint your tyrolean walls yourself.
However, this type of task is something we'd always recommend leaving to a professional if you're not confident in your skills. Painting your tyrolean walls poorly will be obvious, often exposing the cement and renders beneath and ruining the look of your property from the outside.
By working with professionals, you remove all the stress and pressure by handing the task over to someone who has the relevant skills, knowledge, and experience to do it right the first time!